As hardwood flooring installers, we don’t normally replace subflooring. We do occasionally repair subflooring at times, but replacing and/or adding a subfloor is usually the job of your remodeling contractor. However, for this case, we removed and replaced the entire subfloor, about 500 square feet.
Not all subflooring is equal. In the case of this home, we removed the carpet and found a subfloor that was made from particle board. Particle board is not an adequate subfloor for hardwood flooring. Particle board is ok when screwing things into it, but it doesn’t work well for hardwood staples. The pressure of the staples blows out chunks under the board and disintegrates the integrity of it. Over time the hardwood staples aren’t being held by anything and the hardwood starts moving.

Pictured here is Gordon removing the particle board subfloor. It just breaks into pieces as he’s trying to pull it up. This is a good indication it would not hold up over time under hardwood.
When speaking of sub par subflooring, tile backerboard also fits the list. The staples blow out the back of the backerboard in the same way as particle board. If you are a DIY kind of person and plan to install a new subfloor prior to a hardwood install, please contact a hardwood expert and get their recommendations on which subflooring will work best. It’s better to be safe than sorry, or worse, out of pocket the additional time and material expenses redoing the subfloor.
For this project, we chose 19/32 OSB Sheathing as our subfloor. Depending on the thickness, pricing ranges from $14-$30 per 4″x 8″ sheet.
But first, we had to remove the carpet and the particle board subfloor.

On the left is the original home’s subfloor, the middle area shows a layer of moisture barrier, then on the right is the particle board we are removing.
A Word About Moisture Barriers
Although many hardwood floor contractors lay a moisture barrier under all their hardwood floor installs, we do not. We only add a moisture barrier when the floor is above a scrawl space where moisture can venture up from the ground. The reason we do not always use a moisture barrier is because more often the moisture comes from above in the form of water damage from dishwashers, fridges, and leaking pipes. With a moisture barrier the water from these types of accidents leak down through the wood slats and sit on top of the barrier stopping the water from naturally dissipating so the wood can dry. We’ve seen water-damaged wood stay wet for a year or more because of these moisture barriers. Without one, the water would seep through the subfloor and naturally evaporate within a month or two. The quicker the hardwood dries the less damage it receives and the quicker we can sand it and get it back to an optimal condition.
For this project, in addition to removing the subfloor, we also removed the moisture barrier.
Prepping the Original Subfloor
The old subfloor was stapled down so we had to remove by hand the staples and screws that were left when we pulled it up. We also checked for dips and hills on the original subfloor and took care of any trouble spots.
Before laying the new subfloor, we spent the time screwing in the original subfloor down to the joists. This helped stop the squeaking we often have with older homes. (Once the hardwood has been installed
In addition to screwing down the new subfloor, we also used the Loctite Contractor’s glue for good measure.

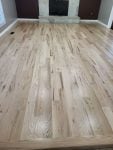
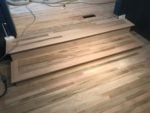
This is an image of the new subfloor in one of the bedrooms.
As mentioned before, please contact us or another hardwood flooring contractor to determine whether your subfloor will work well long term under hardwood flooring. Have questions? Give us a call or shoot us an email.